Customization Templates
Our customizations API provides a very flexible way to easily setup customizable products.
In this article:
Visual Template Editor
Below is a screenshot of the template editor page.

As you can see, the editor is divided in 4 sections:
- Actions Buttons: These list includes buttons to Close, Reload, Preview the template and Rendering Settings.
- Design Canvas: This area shows a preview of the customizatin template. Here you will be able to drag, rotate and resize the different elements.
- Views List: Lists all the Views currently in the template.
- Customizations List: Lists all the Views currently in the template.
Views
A customization template can have one or more Views which you can use to set the different sides of your product. For example, if you sell t-shirts, you can use one View for the front of the t-shirt, and another view for the back of the t-shirt.
How to create a View: To create a new View, click on the "Add New View" Link in the Views List.

How to update a View: To update a view click on the respective view's "View Settings" button.

A small modal window will pop-up where you can change the View's name and dimensions. After you complete your changes, click on the Save button to save your changes.

How to delete a View: To delete a view click on the respective view's Trash button. This will remove the View and all its layers and customizations.
Layers
The Products Customizer implements a layer-based system. One view can contain one or more layers. Layers contain one or more product customizations. One of the main purposes of Layers is to allow you to split your customizations in different areas of the product. For example, if you sell pocket t-shirts and you want customers to add their name but only within the pocket, then you can add a Layer called "Pocket Layer" that covers only the pocket area of the t-shirt.
How to see the Layers List: In the editor layers are initially hidden when your first open the editor. To see the layers click on the "Layers List" button. After clicking this button you will see a list with all the layers in the current view.

How to create a Layer: To create a new Layer, click on the "Add Layer" button at the top of the Layers List.
How to update a Layer: To update a layer click on the respective layer's item in the Layers List. A small modal window will pop-up where you can change the Layer's settings. You can also select the layer in the Design Canvas to drag it, rotate it or resize it. After you complete your changes, click on the Save button to save your changes.

How to delete a Layer: To delete a layer click on the respective layer's item in the Elements List. A small modal window will pop-up where you can see the Layer's settings. Click on the Trash button to remove the Layer and all its customizations elements.
Customizations
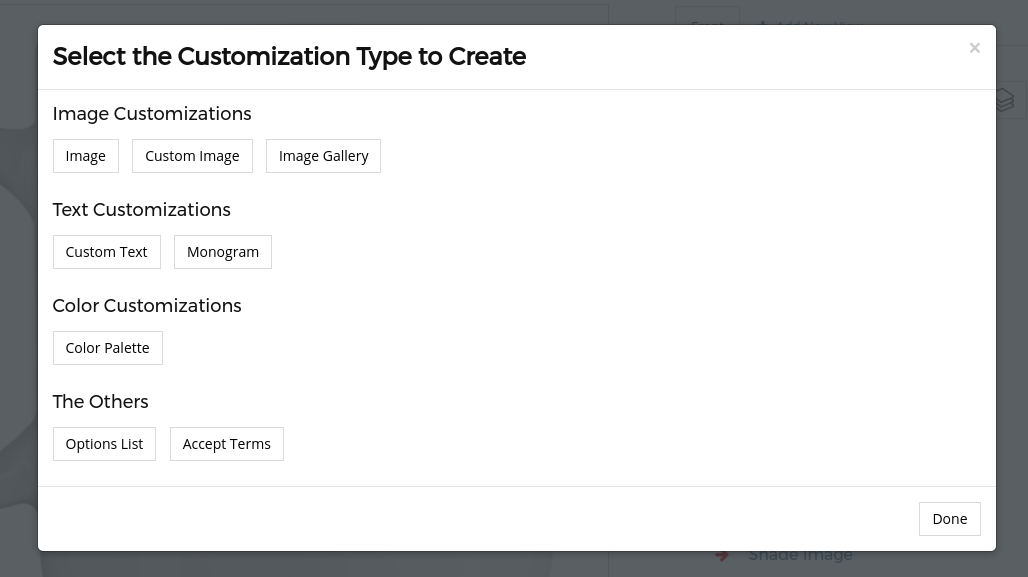
There are many types of Customizations you can use, we divide them in 4 types:
- Image Customizations,
- Text Customizations,
- Color Palettes,
- Non Visual Customizations - for example: Options Lists and Accept Terms.
When you initially open the Template Editor you'll see the Customizations List, which shows all the customizations in the current View. Like mentioned above, you can also click on the "Layers List Button" to show all the Layers in the current View. In the Layers List you'll see the Customizations in specific layers.
How to add a Customizations:
To add a new Customization while in the Customizations List click on the "Add Customization" button:

You can also add a Customization to a specific Layer while in the Layers List by clicking on the "Add Customization" link in the respective layer.
A pop-up will open where you can select the type of Customization you want to add.
To learn more about each Customizations features click on the respective link below: